Trauma Laparotomy
Trauma Laparotomy (Crash Laparotomy)
David Ray Velez, MD
Table of Contents
Operative Sequence
Position: Supine with Arms Extended
Prepare from the “Chin to Knees”
Operative Sequence
- Step 1. Access and Exposure
- Step 2. Temporary Bleeding Control
- Step 3. Exploration
- Step 4. Decision (Definitive Repair vs. Damage Control)
- Based Upon the Sequence Outlined in “Top Knife” by Hirshberg and Mattox
Access and Exposure
Standard Incision: Long Midline Incision from Xiphoid to Pubis
- Consider Smaller Incisions (Upper Midline, Lower Midline, etc.) If the Patient is Not Crashing and Time Allows or There are Indications of Specific Injury
- Major Pitfall: Iatrogenic Injury to Left Liver, Bowel, or Bladder
Other Incisions
- Extend Incision Superiorly/Inferiorly to Enter Virgin Territory
- Chevron Incision (“Bilateral Subcostal”, “Double Kocher”, “Rooftop”)
- Mercedes Incision
- *Used to Avoid Scarring if Necessary but May Limit Exposure in Other Areas – Generally Only Considered in Select Circumstances
Enter Rapidly but in a Controlled Manner and Eviscerate the Bowel Early
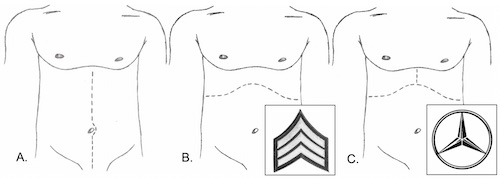
Incisions: (A) Midline, (B) Chevron, (C) Mercedes
Temporary Bleeding Control
Approach
- Blunt Trauma: Begin with Empiric Packing
- Penetrating Trauma: Begin by Directly Approaching the Bleeding
- *Some Recommend Empiric Packing in All Trauma Cases
Packing
- Pack Early – Packing Relies on the Ability to Form Clot and is Less Effective Once Coagulopathy Develops
- Techniques:
- “From Within” – Pack Laparotomy Pads into a Cavity Applying Outward Pressure
- “From Without” – Create a Sandwich to Reapproximate Disrupted Tissue Planes
- Empiric Packing Sites:
- Over and Under the Liver
- Over and Under the Spleen
- Along the Right Paracolic Gutter
- Along the Left Paracolic Gutter
- In the Pelvis
Rapid Supraceliac Control (If Exsanguinating)
- Clamping the Distal Thoracic Aorta Through the Abdomen
- Avoids the Thick Fibrous Attachments as the Abdominal Aorta Passes Thorough Diaphragm
- Step 1. Divide the Gastrohepatic Ligament
- Normally Avascular but Watch for a Replaced Left Hepatic Artery
- Step 2. Reflect the Stomach/Esophagus to the Left to Visualize the Aorta
- May Require Division of the Diaphragmatic Crura
- Step 3. Bluntly Dissect the Aorta
- Step 4. Occlude the Aorta
- Options:
- Manual Compress Against the Spine
- Aortic Root Compressor/T-Bar Against the Spine
- Aortic Vascular Clamp – Consider Umbilical Tape to Hold Up
- Options:
Other Options for Rapid Control of the Supraceliac Aorta
- Left Anterolateral Thoracotomy with Thoracic Aortic Control
- Resuscitative Endovascular Balloon Occlusion of the Aorta (REBOA)
Supraceliac Control of the Aorta
Exploration
Explore Once Bleeding is Temporarily Controlled
Order of Exploration
- Step 1. Inframesocolic Exploration
- Step 2. Supramesocolic Exploration
- Step 3. Lesser Sac Exploration
- Step 4. Retroperitoneum Exploration
- *Some Report Different Orders of Exploration – Exact Order is Not as Important as Making Sure to Preform it the Same Way Every Time and to Not Miss Any Injuries
Inframesocolic Exploration
- Lift the Transverse Colon Cranially
- Run the Bowel from the Ligament of Treitz to the Rectum
- Transverse Colon and Hepatic/Splenic Flexures are Notorious for Missed Injury
- Inspect the Bladder and Pelvis
Supramesocolic Exploration
- Pull the Transverse Colon Caudally
- Inspect from Patient Right-to-Left
- First: Examine the Liver, Gallbladder, and Right Kidney
- Second: Examine the Anterior Stomach and Duodenum
- Third: Examine the Spleen and Left Kidney
- Additionally Examine the Bilateral Diaphragms
Lesser Sac Exploration
- Bluntly Dissect Through the Gastrocolic Ligament/Greater Omentum to Enter the Lesser Sac
- The Left Side is Generally Less Vascular
- Examine the Posterior Stomach and Pancreas
Retroperitoneum Exploration
- Keep Retroperitoneal Exploration Targeted and Limited
- Indications for Exploration:
- Zone I (Central): Mandatory Exploration
- Zone II (Lateral):
- Penetrating: Selective Exploration
- Blunt: Explore Only if Expanding, Pulsatile, or with Active Hemorrhage
- Zone III (Pelvis):
- Penetrating: Mandatory Exploration
- Blunt: Explore Only if Expanding, Pulsatile, or with Active Hemorrhage
- Clinical Suspicion Based on Missile Trajectory or Presence of Hematoma
- Maneuvers:
- Left-Sided Medial Visceral Rotation (Mattox Maneuver)
- Right-Sided Medial Visceral Rotation (Cattell-Braasch Maneuver)
- Kocher Maneuver
- Cephalad Transverse Mesocolon Reflection
- *See Maneuvers and Retroperitoneal Exposure – The O.R.
- There is Significant Overlap with Maneuvers and They Should be Tailored to the Individual Patient
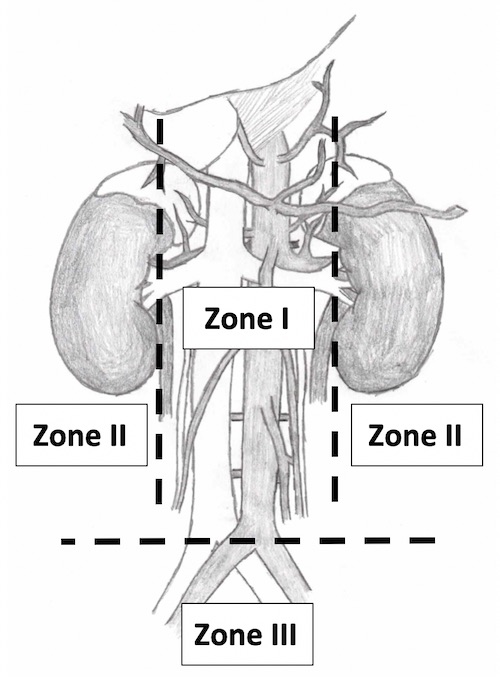
Retroperitoneal Zones
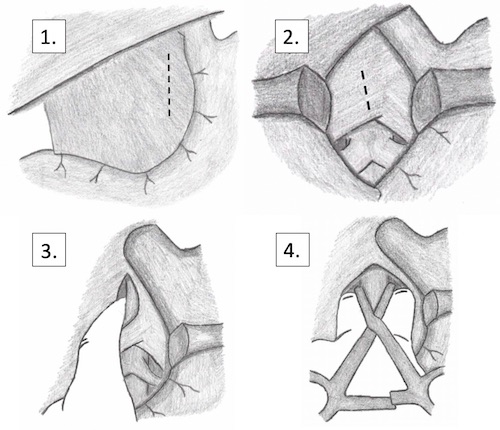
Maneuvers to Access the Retroperitoneum: 1. Mattox, 2. Cephalad Transverse Mesocolon Reflection, 3. Kocher*, 4. “Extended” Kocher*, 5. “Super-Extended” Kocher*, *#3-5 Together Compose the Cattell-Braasch Maneuver
Decision (Definitive Repair vs. Damage Control)
Damage Control Definition: Surgery to Stabilize with Delayed Definitive Repair
Goals of Damage Control
- Arrest Hemorrhage
- Limit Contamination
- Maintain Blood Flow
- Temporary Abdominal Closure
- Operative Time Limited to Minimize Further Hypothermia, Coagulopathy and Acidemia
Indications for a Damage Control Procedure
- Severe Physiologic Insult
- Acidosis (pH < 7.2)
- Base Deficit > 14-15
- Lactate > 5
- Temp < 34-35
- Coagulopathy (Clinical Evidence or INR > 1.5)
- Intraoperative Ventricular Arrhythmia
- High Blood Loss
- Unable to Control Bleeding by Conventional Methods
- Blood Loss > 4 L
- Blood Transfusion > 10 U
- Injury Pattern
- 5 Different Injury Patterns
- Difficult to Assess Major Venous Injury
- Massive Hemorrhage from the Pancreatic Head
- Major Liver or Pancreaticoduodenal Injury with Hemodynamic Instability
- Pancreaticoduodenal Devascularization or Massive Disruption with Involvement of Ampulla or Distal CBD
- Need for Staged Reconstruction
- Need to Reassess Bowel Viability
- Unable to Close Abdominal Wall Without Tension
- Signs of Abdominal Compartment Syndrome While Attempting Closure
The Exact Indications are Controversial and Continually Evolving
Damage Control Phases
- DC-0: Preoperative
- DC-I: Initial Operation
- DC-II: Resuscitation
- DC-III: Definitive Repair
- DC-IV: Delayed Soft Tissue Reconstruction (If Needed)