Tracheostomy Care and Long-Term Ventilator Weaning
Tracheostomy Care and Long-Term Ventilator Weaning
David Ray Velez, MD
Table of Contents
Tube Exchange
Inner Cannula
- Allows Easy Replacement of the Cannula if it Becomes Obstructed or Filled with Secretions
- Change Every 12-24 Hours
- Done Routinely to Prevent Secretion Hardening and Obstruction
Outer Cannula
- First Postoperative Exchange Done After 7-14 Days
- Not Before 3-5 Days (Allow Tract Maturation)
- Exact Timing Not Well Defined
- Changing Every 1-2 Weeks Decreases Risk of Infection/Granulation Tissue
- Methods:
- The First Exchange is Generally Done Over a Blue Bougie
- Subsequent Exchanges, Once the Tract is Well Defined, are Done by Simple Removal and Replacement with an Obturator

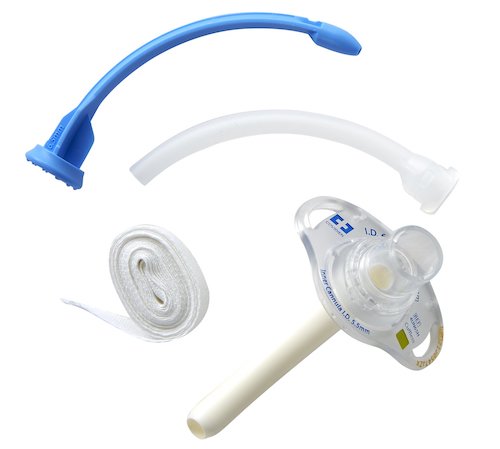
Tracheostomy Obturator (Top), Inner Cannula (Middle), and Outer Cannula (Bottom)
Long-Term Ventilator Weaning
General Approach
- Step 1. Still Requiring Airway Protection and Mechanical Ventilation
- Step 2. Transition to T-Piece or Trach Collar Once No Longer Requiring Mechanical Ventilation
- Step 3. Allow Airflow Around the Tube Once No Longer Requiring Airway Protection
- May Consider Passy-Muir Valve or Capping Once Appropriate
- Step 4. Decannulation
T-Piece and Trach Collar
- These Weaning Methods Only Provide Supplemental Oxygenation Once the Patient is No Longer Requiring Mechanical Ventilation
- T-Piece
- Tubing Attached to the End of the Tracheostomy in a “T” Fashion to Allow Blow-By Oxygen
- Allows Attachment of In-Line Suction for Better Secretion Clearance than a Trach Collar
- Trach Collar
- An Oxygen Mask is Placed Over the End of Tracheostomy to Provide Supplemental Oxygen
- More Portable Than T-Piece and Many Consider It to Have a Lower Risk of Accidental Decannulation
Allowing Airflow Around the Tube
- Indicated Once No Longer Requiring Airway Protection
- Methods:
- Down-Sizing (Decreasing the Size of the Tracheostomy Tube)
- Often Down to a Size 4.0 Shiley
- Cuff Deflation
- Change to a Cuffless Tube
- Change to a Fenestrated Tube
- Down-Sizing (Decreasing the Size of the Tracheostomy Tube)
- Benefits:
- Improves Comfort
- Facilitates Weaning on Spontaneous Breathing Trials with Shortened Weaning Time
- Allows More Airflow Past the Tube for Improved Speech Function
- *Does Not Prevent Aspiration

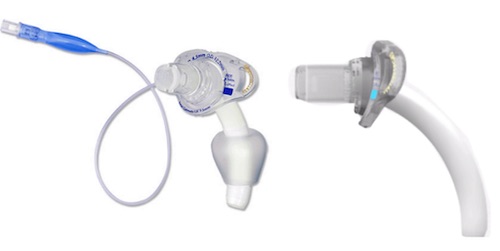
Tracheostomy Cuff: Cuffed (Left), Uncuffed (Right)

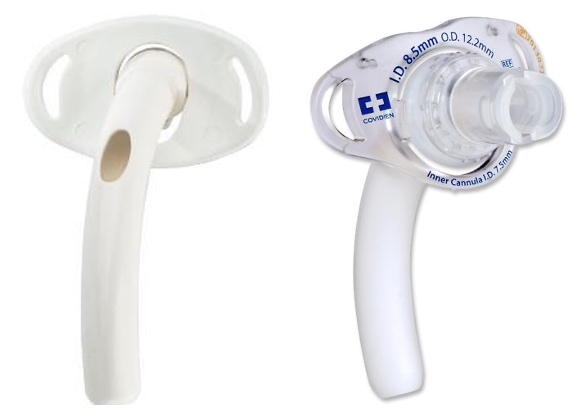
Tracheostomy Fenestration: Fenestrated (Left), Non-Fenestrated (Right)
Passy-Muir Valve (PMV/Speaking Valve)
- A One-Way Valve Placed onto the Hub of the Tracheostomy
- Allows Air Inflow but Blocks Expiration
- Redirects Airflow into the Upper Airway on Expiration
- Allows Air Passage Through the Vocal Cords for Speech
- Requires Either a Fenestrated Tracheostomy or Cuffless Tube (May Deflate the Cuff Instead)
- *NEVER Apply a PMV to a Non-Fenestrated Tube without Deflating the Cuff (No Route for Expiration)
- “Finger Occlusion” While Speaking Can Serve the Same Function

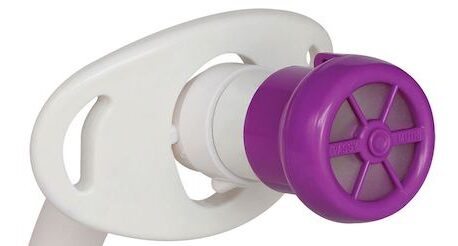
Passy-Muir Valve
Capping/“Corking”
- A Cap Placed onto the Hub of the Tracheostomy
- Completely Blocks Airflow Through the Tube
- All Airflow in and Out Must Be Through the Mouth and Around the Tube
- Requires Either a Fenestrated Tracheostomy or Cuffless Tube (May Deflate the Cuff Instead)
- *NEVER Cap a Non-Fenestrated Tube without Deflating the Cuff (No Source for Inspiration)
- Generally Consider a Final Measure in the Weaning Process Before Decannulation
Decannulation Timing
- Institution Dependent with Wide Variations
- Do Not Remove Before 7-10 Days (Tract is Immature)
- Consider Decannulation Once Capped for ≥ 24-48 Hours
- Consider Once a Speaking Valve is Tolerated
